Advisor Guide: Financial Planning with Adviice
This guide will walk you through an entire financial planning engagement using Adviice. It will:
- Describe the client experience
- Explain automated elements of Adviice and how they are triggered
- Outline initial set-up requirement for advisors
- Show possible customization for each area of the platform
This is intended for advisors getting started with the platform who are doing one-on-one financial planning as opposed to one-to-many financial planning which will be covered in another guide. While there are other options for financial planning on Adviice, this is our recommended flow that takes advantage of the full power of the platform.
If you would like to see a video walk-through, you can see that here.
Financial Planning Process Overview:

Our goal with Adviice is to automate as many parts of the process as possible, so time spent with clients and their financial data maximizes your value.
We have broken down the process into 9 steps. You can skip to the section on that step by clicking the title link below:
- Onboarding: Clients sign up and create their own account on the platform
- Trial: Clients explore the platform for a set amount of time
- Discovery & Proposal: Clients meet with you to discuss their needs and you send them a proposal
- Payment: Clients make a payment through the platform using the Stripe integration
- Data Gathering & Review: Clients input financial information into the platform for your review
- Foundation Meeting: You meet with the client a second time to confirm key information and assumptions
- Planning: You create projections and a plan report using AI strategies
- Planning Meeting: You meet with the client to review your findings and recommendations
- Ongoing Planning: Clients automatically roll over to a monthly subscription for ongoing planning
- Set-Up Checklist
Onboarding

How it Works:
The core way to onboard new clients in Adviice is through a link. This can either be a link connected to a specific planner or a more general company link
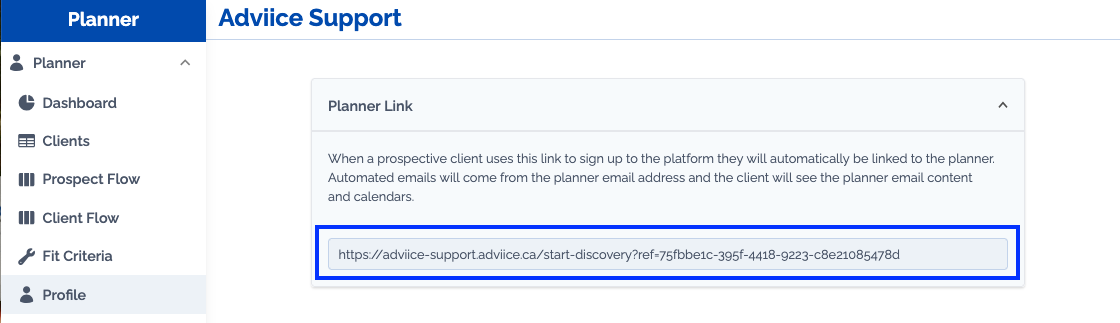
Solo Planners
Use your personal planner link (found in your profile).
Ideal for:
- Prospective clients from your website or social media.
- Encouraging referrals from existing clients.
Anyone signing up through this link will be automatically connected to your planner profile, and will:
- Receive your custom email onboarding flow
- See your personal calendar availability for discovery calls.
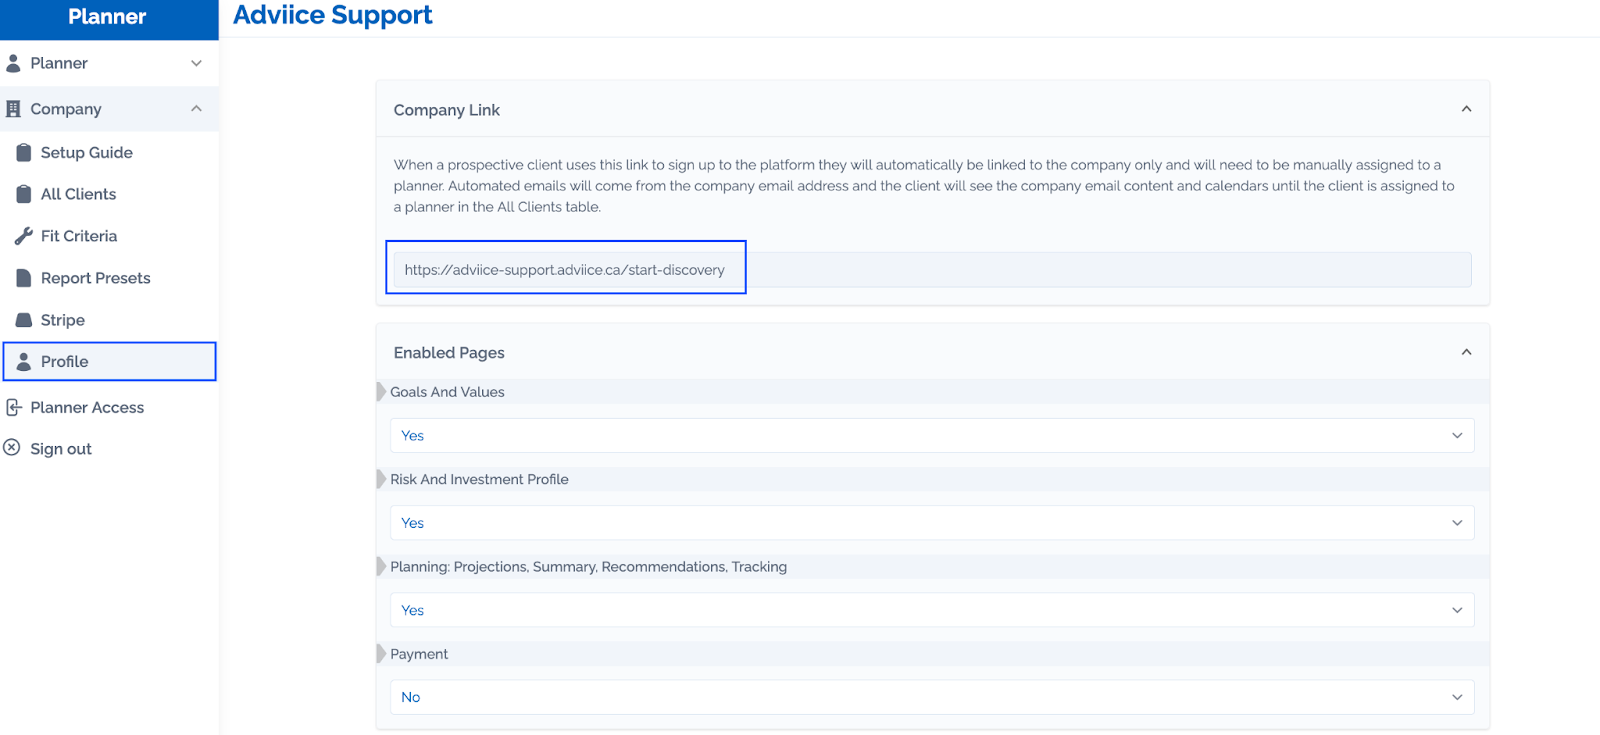
Larger Teams or Organizations
Use the company profile link for a more general onboarding experience.
Ideal for:
- Websites with a general call to action (e.g., “Start your retirement plan”).
- Campaigns where planner assignment will be handled internally.
Clients using this link will receive:
- Generic emails and shared calendars from the company profile.
- A broader onboarding path (e.g., round-robin meeting bookings).
What Clients See When They Sign Up
No matter which link you use, the client onboarding experience looks the same at first:
Initial Sign-Up
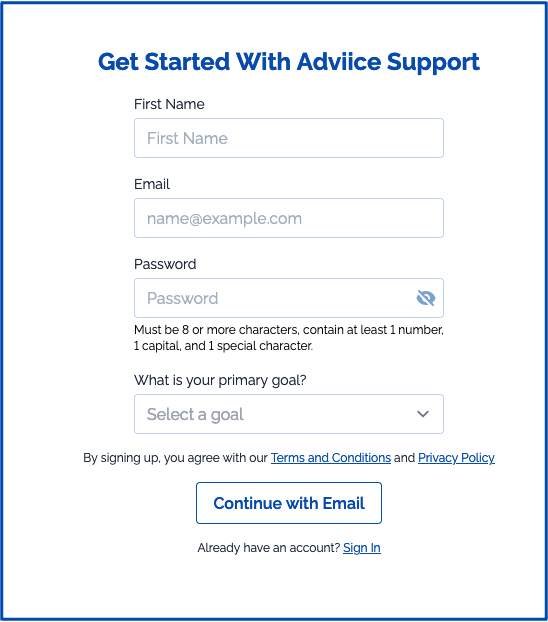
Clients provide:
- Name
- Password
- Primary financial goal
They’ll then receive a confirmation email to activate their account. This email is automatically sent and can be customized in the Planner Portal.
Onboarding Questions
Once the client has activated their account they will be prompted to answer a series of onboarding questions. You can see them in the video below:
This is a guided intake process designed to set up the structure of the platform. Clients will not see account/insurance types they don’t select, although they can always be added in the Profile Section of the Client Portal.
Viewing New Clients in the Portal
Once a client signs up:
- They will appear under Client/All Clients in the planner dashboard.
- You'll see:
- Client names and details
- Sign-up date
- Assigned trial period
- Planner (if assigned)
You can:
- Manually assign them to a planner (if they used the company link).
- Extend trial periods (e.g., if someone was on vacation).
- Label clients as “Good Fit” or “Bad Fit” for internal tracking.
Client's view of Confirm and Welcome Email:


This text can be customized in the Planner Portal.
To Do: Initial Set-Up:
In order to have a smooth onboarding flow, you will need to:
- Add Planner Link and/or Company Link to Website and Email Signature
- Confirm “Confirm Email’ Text
- Confirm Welcome Email Text
Optional: Additional Customization/Best Practices:
Trial

How it Works:
When a trial is active, clients can:
- Fill in assets, debts, goals, income, and expenses.
- See 10-year retirement projections.
- Book meetings using your discovery calendar.
🕒 Trial duration is customizable per client or in bulk from your settings. Default is 7 days.
After the trial ends:
- All data remains intact.
-
Access is limited to the “Book Meeting” and profile pages.

- They’ll be prompted to upgrade for full access.

To Do: Initial Set-Up:
OPTIONAL: Additional Customization/Best Practices:
Discovery & Proposal

How it Works:
What is the Discovery Call:
The discovery call is a crucial first conversation. Use it to:
- Understand the client’s motivation: Why a financial plan? Why now?
- Listen to their concerns and goals.
- Introduce your services and pricing if appropriate.
How do Clients Book a Discovery Call:
Clients can book a discovery call directly from the platform using the Book a Meeting Function
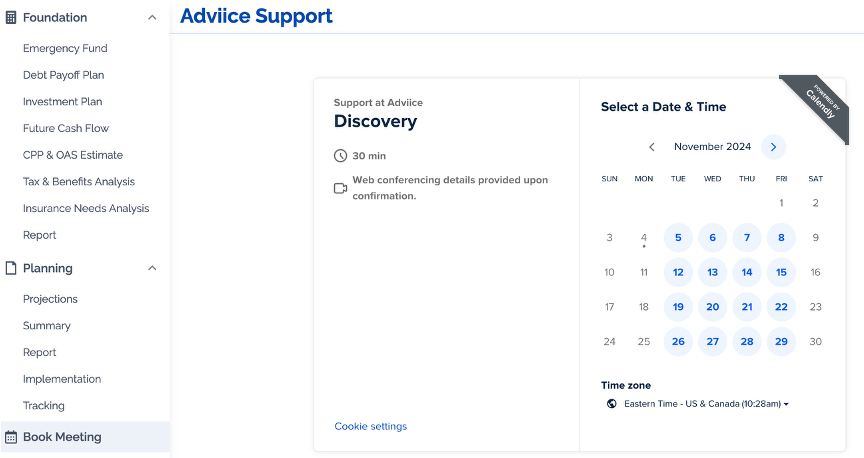
This calendar is synced with your booking system (e.g., Calendly) through the Planner Portal.
Syncing Your Calendar to Adviice:
You can add your booking system by embedding directly into Adviice or if your booking system doesn’t have an embed code, you can still add it by using this method.
These are added to Planner Portal in the Profile > Calendar iFrames Section.
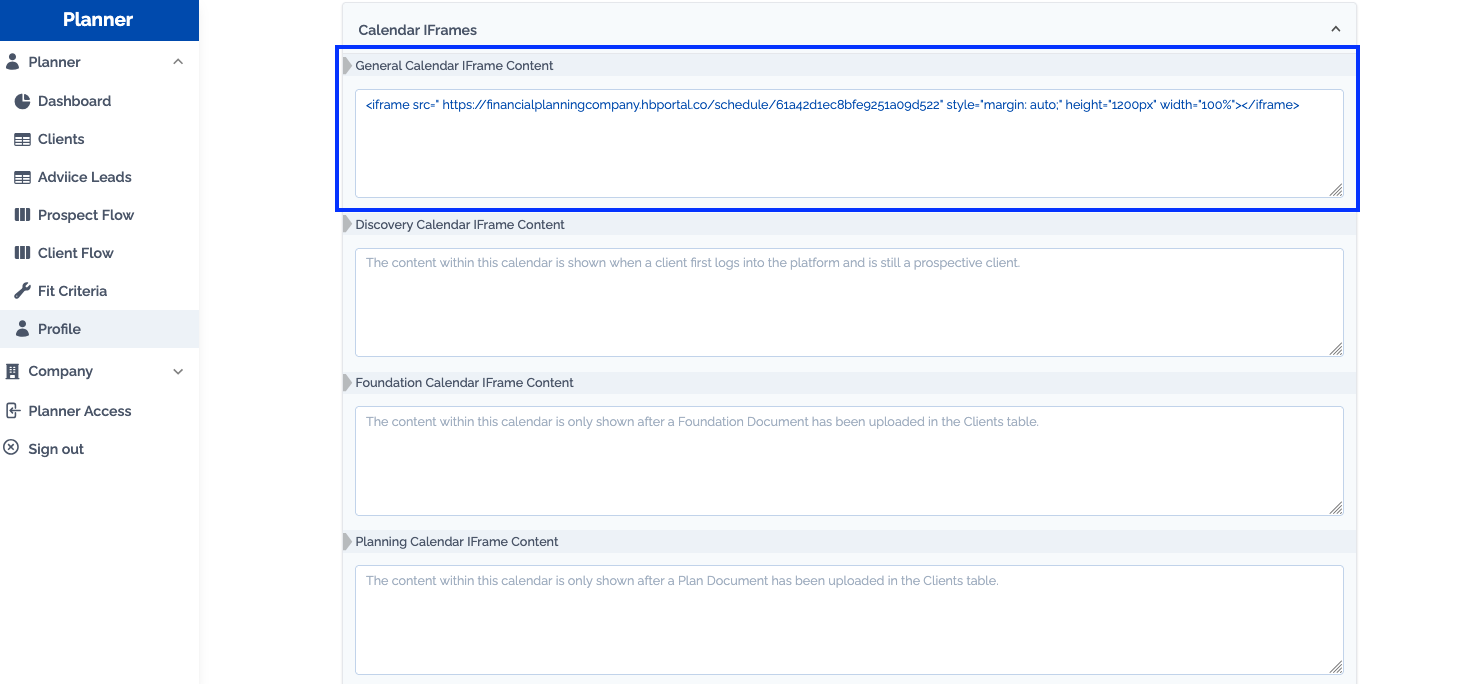
There are four calendars that are conditional:
- Discovery Calendar: This shows up before a client has paid or been "marked as paid" in the back end.
- Foundation Calendar: This shows up after you create a Foundation Report, publish it, and click the "send email" button. This sends the Foundation Email and allows the Foundation Calendar to show.
- Planning Calendar: This shows up after you create a Planning Report, publish it, and click the "send email" button. This sends the Planning Email and allows the Planning Calendar to show.
-
Ongoing Calendar: This is shown only to clients that are moved into the 'Ongoing Engagement' column of the Client Flow.


If you always want to show a calendar, you can use the General Calendar embed area. When a calendar code is added in the General Calendar it will always be shown.
Sending a Proposal
After the discovery call:
- Send a personalized proposal email summarizing:
- Key points from the call.
- Engagement type you recommend (e.g., Retirement Plan, Ongoing Planning).
- Include a direct payment link to the specific service.
This creates a seamless experience — the client logs in and goes directly to their personalized payment page.
To Do: Initial Set-Up:
OPTIONAL: Additional Customization/Best Practices:
Payment

How it Works:
Payments can be processed directly through the platform with a Stripe integration. This allows clients to pay, cancel and automatically roll over to ongoing fees without additional admin work.
Setting up Stripe:
With the Stripe integration you can create a number of different types of payment options including an initial payment, installment payments, or subscription payments. You can see how to set that up here.
You’ll be able to:
- Define service levels
- You can create separate payment links for each engagement type.
- Once payment is made, the client transitions smoothly into the full planning phase, and eventually into ongoing support if offered.
Once the payment link is sent, the client will click on it and see:

You can see some other payment options and resources here:
- How to Create a New Service Offering?
- How to Mark a Client as ‘Paid’ on the Backend?
- How to Update a Change In Sales Tax?
- How to Create Coupon/Refferal Codes
- Where Can Clients Find Receipts for Planning Fees?
Once clients have paid, they will receive the Discovery email which prompts them to begin data entry on the platform.
To Do: Initial Set-Up:
OPTIONAL: Additional Customization/Best Practices:
Data Gathering and Review

How it Works:
Client Led Data Entry:
One of the big differences between Adviice and other platforms is that data entry is client led. Adviice is designed to have clients fill in their information directly into the platform. This process is laid out in detail in the Advisor Guide: Creating Your First Plan which goes through each section in more detail. You can navigate to sections directly by using the list below.
- Goals & Values
- Risk & Investor Profile
- Income
- Expenses
- Cash Flow
- Assets
- Debts
- Net Worth
- Insurance
- Tax & Benefits
- Upload Documents
Information Review:
Once the client is finished uploading their information, you will begin your review.
Access & Review Discovery Information
Start by logging into your client’s profile using the Access button. From here, you’ll review and refine the information they've entered during the Discovery phase.

- Cross-check entries: Clients may not enter everything perfectly. Use uploaded documents to validate and correct data.
- Comment as you go: Leave comments when making changes. These serve both as internal notes and conversation prompts for the client. These comments will also be automatically pulled into your Report
Build a Foundation Report
When your review is complete you can build a Foundation Report.
- Navigate to Foundation > Report.
- Use the presets to pull in specific sections or a complete set of pages
- The platform pulls in most data automatically
- Manually add any additional notes (e.g. pension options).
- Best Practice: Highlight open questions in red.
You can see a video on how to create a report here.
Publish your Foundation Report
Reports can be published directly on the platform, and will be visible to clients in Foundation > Reports.
Once you have published your report, click 'Send Email' to notify your client that a report has been published and to prompt them to book a call.

Client's view of Foundation Email:

This text can be customized in the Planner Portal.
To Do: Initial Set-Up:
OPTIONAL: Additional Customization/Best Practices:
- Add Videos to the platform to help guide clients data entry
- Customize Foundation Email Text for Your Clients
- Create Custom Foundation Templates
- Create Custom Foundation Calendar and add to platform
- Disable Warning messages on specific pages
Foundation Meeting

How it Works:
What is the Foundation Call:
A Foundation call is the second touch point between you and a client. It's best used to review key data, confirm planning scenarios and discuss any questions that arose during the data gathering phase.
How do Clients Book a Foundation Call:
Clients can book a Foundation call directly from the platform using the Book a Meeting Function. This custom calendar will only appear once you have published and emailed a Foundation Report.

Best Practices for Foundation Call
- Prepare: Create a second version of the Foundation Report to capture updates made during the call.
- Collaborate: Share your screen with the client to facilitate real-time collaboration and clarification.
- Validate Data: Confirm all inputs and assumptions with the client.
- Adjust On-the-Fly: Make notes of client feedback and ensure it is incorporated into the report.
- Capturing Feedback: Use the second version of the Foundation Report to:
- Document new inputs or adjustments.
- Mark resolved items by changing red highlights to black.
- Note items requiring follow-up or further changes.
- Include a record of reviewed and unreviewed documents (e.g., insurance statements).
- Highlight any missing information and its impact on planning.
- Watch an Example: You can see Owen work through an example of a foundation call and review in this video starting at 27:11.
Post-Call Updates
- Incorporate Changes: Mark updated items in the Foundation Report to indicate completion.
- Finalize the Report: Publish the updated Foundation Report for client review.
- Ensure clients have access to both the original and revised versions.
To Do: Initial Set-Up:
- None
OPTIONAL: Additional Customization/Best Practices:
- None
Planning

How it Works:
In this stage, planners use AI strategies to build and test scenarios. For more detail on planning and using AI strategies, you can use the Advisor Guide: Creating Your First Plan.
Scenario Best Practices:
-
Scenario Descriptions: Use descriptions field to highlight differences between scenarios

-
Base Scenario: Select a Base Scenario that you would like to highlight. The data from this scenario will automatically be pulled into your report

-
Lock Scenarios: Lock finalized scenarios to preserve the integrity of the report. A locked scenario cannot be edited by the client and will not pull in new information from discovery

- Dynamic Scenario: Make sure there is one copy of the base scenario left unlocked to provide a “dynamic base scenario” for clients to experiment with independently.


Build a Final Plan Report
When you've completed your scenarios you can build a Final Plan Report.
- Navigate to the Planning > Report builder.
- Create a Report
- Use the presets to pull in specific sections or a complete set of pages
- The platform pulls in most data automatically. These data points will be blue.
- Add charts from any scenario, discovery or foundation phase.
You can see a video on how to create a report here.
Create Implementations
- Include detailed action items with timelines.
- Example: "Target $15,000 of RRSP contribution this year to maximize Canada Child Benefit benefit for Jennifer"
- Example: “Review CPP Timing in January 2028 (three years from now)”
Publish your Final Plan Report
Reports can be published directly on the platform, and will be visible to clients in Planning > Reports.
Once you have published your report, click 'Send Email' to notify your client that a report has been published and to prompt them to book a call.
Client's view of Final Plan Email:

This text can be customized in the Planner Portal.
To Do: Initial Set-Up:
OPTIONAL: Additional Customization/Best Practices:
Planning Meeting

How it Works:
What is the Final Plan Call:
The Planning Meeting is when you present your recommendations and report.
How do Clients Book a Final Plan Call:
Clients can book a Final Plan call directly from the platform using the Book a Meeting Function. This custom calendar will only appear once you have published and emailed a Planning Report.

Best Practices for Final Plan Call:
- Review Report: Walk through the report with the client:
- Discuss recommended strategies and charts.
- Highlight key outcomes and trade-offs.
- Answer Questions Live: Address client questions and explore additional details/scenarios live with the platform if needed.
- Emphasize flexibility: Reinforce that plans evolve with changing circumstances.
- Encourage clients to document thoughts and updates in the platform.
-
Implementations: Review implementations and show where they can share their progress by editing an Implementation
Ongoing Planning Discussion
- Introduce the concept of ongoing planning:
- Highlight planning questions in their plan that will need updates and review in the future
- Explain the process and what they can expect
- Detail the cost of ongoing planning
To Do: Initial Set-Up:
- None
OPTIONAL: Additional Customization/Best Practices:
- None
Ongoing Planning

How it Works:
What is Ongoing Planning:
Once the initial engagement is completed, clients automatically transition to ongoing planning and begin to pay a monthly fee. This amount has been set when you created your initial service offering.
Ongoing planning can be offered through monthly, semi-annually or annual meetings. We recommend targeting a semi-annual meeting schedule of January and September meetings for all clients.
How do Clients Book a Ongoing Planning Call:
Client's can book a meeting directly using the Book a Meeting Section. This custom calendar only appears when clients are manually moved into the 'Ongoing Engagement' column of the Client Flow.
Best Practices for Ongoing Planning:
Proactive Client Communication
- Send a reminder email in December encouraging clients to update their information.
- Ask them to review income, expenses, assets, debts, insurance, and pensionable earnings.
- Include clear instructions and where to book for January/February
- Encourage uploading relevant documents like pay stubs, investment statements, or insurance policies.
Smart Scheduling and Time Blocking
- Block off January and February for update meetings to keep things consistent.
- Limit meetings to a manageable number per day and reserve time (e.g., Friday afternoons) for preparation and review.
- Offer a fallback window in September/October for clients who miss the main window.
Pre-Meeting Preparation
- Review client updates and uploaded documents before the call.
- Open both the current and previous plans side-by-side to spot key changes.
- Pre-set a "Plan Update" action in the calendar or platform to track progress.
Meeting Structure and Flow
- Review the discovery and foundation sections to verify any changes in income, expenses, debts, or government benefits.
- Focus on the projections section, reviewing strategy updates and exploring scenarios as needed.
- Update implementation actions, lock any finalized scenarios, and clarify the next steps.
Follow-Up and Documentation
- Use the dynamic plan as the living document—no formal reports unless significant changes occur.
- Update the implementation list with new and completed tasks.
- Limit follow-up to urgent issues; most questions can wait until the next meeting.
Mid-Year Checkpoint (Optional)
- Offer a shorter check-in meeting in September or October focused on tax planning and year-end actions.
- Prompt clients in August to book these calls.
- Use the checkpoint to review any outstanding implementation items from the earlier update.
To Do: Initial Set-Up:
- None
OPTIONAL: Additional Customization/Best Practices:
Set Up Checklist
Automated Emails:
- Confirm “Confirm Email’ Text
- Confirm Welcome Email Text
- Confirm Discovery Email Text
- Confirm Foundation Email Text
- Confirm Final Plan Email Text
Optional:
Connect Your Calendar:
Optional:
Set up Your Service Levels:
Free Trial:
Onboarding Clients:
- Add Planner Link and/or Company Link to Website and Email Signature
Optional:
- Set Fit Criteria
- Add Testimonials to your sign-in
- Add Instructional Videos to the platform to help guide clients data entry
- Disable Warning messages on specific pages